How Track Impulse Routes Haptics
Track Impulse reads live data from your sim and generates haptic effects (road vibration, kerbs, ABS, engine rumble, and more) in real time. These effects need to reach the right physical shakers or pedals on your rig. The setup flow has four layers:
Zone -- a named output position on your rig (e.g. Left Front, Custom 1). You can have up to 8 zones.
Channel -- which output on the device each zone is wired to.
Routing -- which effects are sent to each zone, and how loud.
You will set these up in order: first select your audio hardware and driver in the Device Setup Wizard (3 steps), then map zones to channels in Zone Setup, then fine-tune which effects go where in Channel Routing.
Track Impulse Zone Map
The Main Window
When you launch Track Impulse, the main window shows all seven haptic effects as individual cards. This is your control centre for everything.
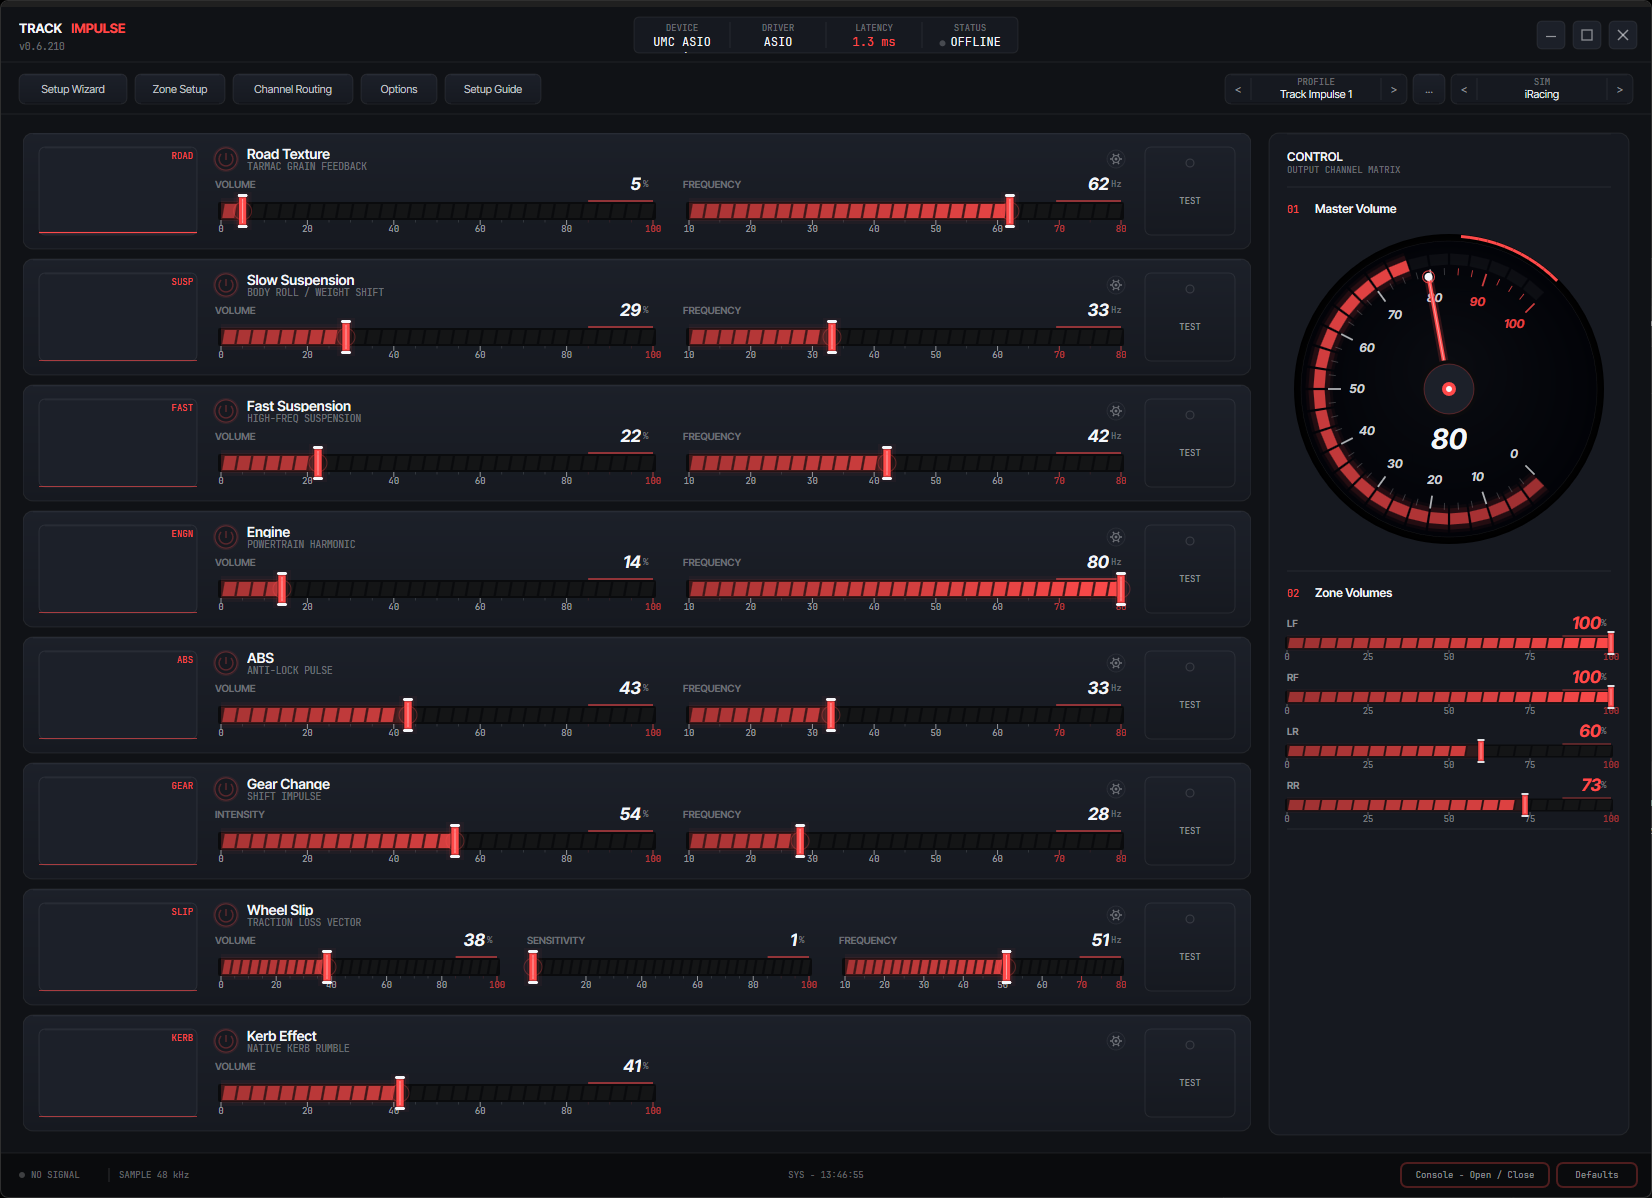
Main Window
The main window shows effect cards arranged in a grid. Each card has a live waveform display at the top, volume and frequency sliders, an activity bar, and a test button. The header bar gives access to Device Setup, Zone Setup, Channel Routing, Profiles, Options, and Advanced Settings.
- Effect cards fill the main area. Each effect (Road Vibration, Spring Suspension, Shock Suspension, Engine Rumble, ABS/Wheel Lock, Gear Change, Wheel Slip, and Kerb for iRacing) gets its own card with a real-time waveform display, a volume slider, a frequency slider, and a test button that lets you preview the effect through your shakers without driving.
- Header bar along the top provides buttons for Device Setup, Zone Setup, Channel Routing, Profiles, Options, and the master volume control. The active sim name appears on the left when a sim is running.
- Master volume in the header controls the overall output level for all effects and zones. This is the final multiplier in the gain chain.
- Sim selector appears when Track Impulse detects running sims. It shows the active sim name and allows you to switch between detected sims if more than one is running (rare, but supported).
- Status bar at the bottom shows the active audio device, driver type, buffer size, sample rate, and estimated latency. Green means the audio stream is running; red means there is a problem.
Device Setup -- Select Device
Open the Device Setup wizard from the header bar. Step 1 shows the physical audio hardware detected on your system. Pick the device that is wired to your bass shakers.
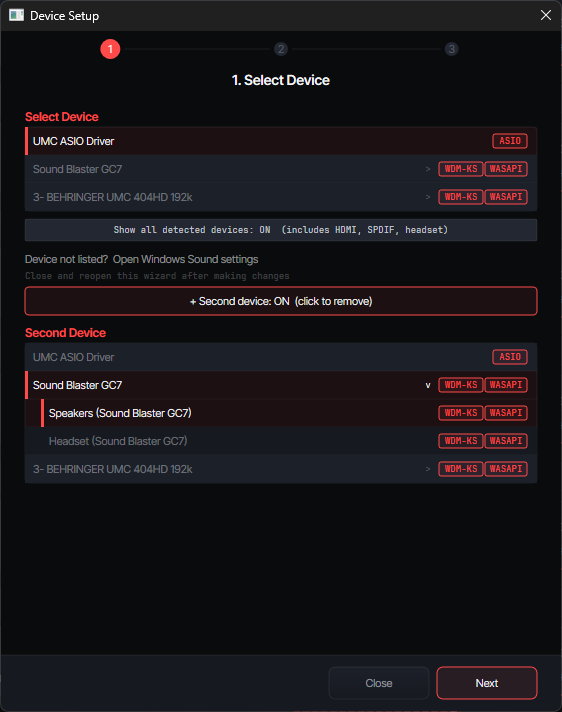
Device Setup -- Step 1
Physical audio devices are listed by their hardware name (e.g. "Behringer UMC404HD", "Sound Blaster GC7"). Available driver badges (ASIO, WDM-KS, WASAPI) appear on the right of each row. Devices with multiple outputs show a chevron -- click to expand and select a specific output.
- Identify your audio interface. The list shows the physical hardware name, not raw driver paths. Find the device your amplifier and bass shakers are wired to.
- Check the driver badges. An
ASIObadge means a native ASIO driver is available for that device.WDM-KSmeans Windows kernel streaming is available.WASAPIis the fallback. ASIO delivers the lowest latency. - Multi-output devices: some adapters (e.g. Behringer UMC404HD) have multiple output pairs. Click the chevron (>) to expand the device and select the specific output you want (e.g. "OUT 1-4" vs "OUT 3-4").
- Multi-device users: click "+ Second device" to add a second adapter. This is useful if you run shakers on one interface and extra zones on another. See the Multi-Device Setup details below.
- Select your device and click Next.
Using two audio devices? Multi-Device Setup
Track Impulse supports output across multiple audio devices simultaneously. This is useful if you have shakers on one interface and extra zones or a different amp on another.
Example: Two-Device Configuration
- In Device Setup → Step 1, click "+ Add a second audio interface" to add your second device.
- Complete the wizard as normal -- both devices will be configured with their own driver, buffer settings, and tested independently.
- In Zone Setup, each zone's channel selector will show which device it belongs to (e.g. "Dev 1 Ch 1" vs "Dev 2 Ch 1"). Assign zones across devices as needed.
- In Channel Routing, the zone columns will display the device label under each zone name (e.g. "Dev 1" / "Dev 2") so you always know where the signal is going.
My device isn't showing up
If the device you wired to your shakers doesn't appear in the list, work through these in order. The first three cover the vast majority of cases.
- Toggle "Show all detected devices: ON" at the top of the device list. By default the wizard hides HDMI, SPDIF, headsets, and obscure outputs to keep the list focused. Turning this on reveals everything Windows can see.
- Check the device is enabled in Windows. Click "Device not listed? Open Windows Sound settings". In the Playback tab, right-click an empty area and tick Show Disabled Devices and Show Disconnected Devices. If your interface is greyed out, right-click and enable it, then reopen the wizard.
- Install the vendor's driver. A surprising number of USB audio interfaces won't appear until their manufacturer driver is installed (Behringer UMC, Focusrite Control, MOTU, PreSonus, etc.). Onboard Realtek and most cheap generic USB cards work out of the box; branded interfaces usually don't. Grab the driver from the manufacturer's website.
- Another app may be holding the device. If something else has the device open in exclusive mode (a browser tab playing audio, Discord, OBS, SimHub, OBS Virtual Camera, voice chat in your sim), it can block Track Impulse from seeing it. Close other audio apps and click Rescan.
- USB power / cable. Bus-powered interfaces sometimes won't enumerate on front-panel USB ports or through hubs. Plug directly into a rear motherboard USB port and try a different cable.
- Restart the wizard after any of the above. Track Impulse only scans for devices when the wizard opens.
Device Setup -- Channels & Buffer
Step 2 configures the buffer size for your selected device. Lower buffer = lower latency, but too low can cause audio glitches. The best audio driver is pre-selected automatically.
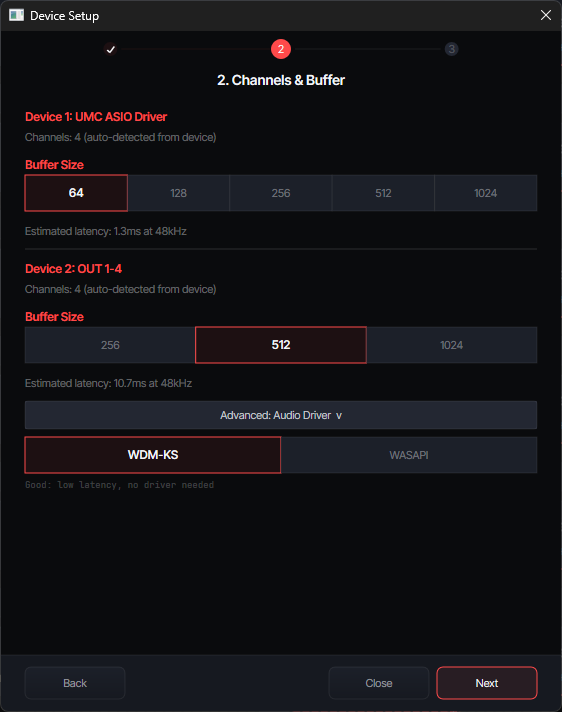
Device Setup -- Step 2
Choose a buffer size from the available options. The estimated latency at 48kHz is shown below. The audio driver is pre-selected but can be changed via the "Advanced: Audio Driver" toggle if your device supports multiple drivers.
- Pick a buffer size. The right starting point depends on your audio driver:
• ASIO: start at 64 (1.3ms at 48kHz). If you hear crackling or glitches, step up to 128 (2.7ms). Most modern USB interfaces handle 64 without issue.
• WDM-KS / WASAPI: start at 512 (the default). These drivers have more overhead than ASIO, so lower buffer sizes are more likely to cause glitches. Only reduce the buffer if your system handles it cleanly. - Estimated latency is displayed below the buffer options. Lower numbers mean faster response. This is the delay you directly control with the buffer size setting.
- Audio driver (Advanced): Track Impulse pre-selects the best driver for your device. If you need to change it, click "Advanced: Audio Driver" to reveal the driver selector. The three options are:
• ASIO (recommended) -- direct hardware access, lowest latency. Achieves as low as 2ms end-to-end.
• WDM-KS (good) -- Windows kernel streaming. No special driver needed. Slightly higher latency than ASIO but still excellent.
• WASAPI Exclusive (fallback) -- bypasses the Windows audio mixer. Use this if WDM-KS causes dropouts on cheap USB sound cards. - Click Next to proceed to testing.
Device Setup -- Test Devices
Verify your shakers are wired correctly by sending test signals to each channel individually.
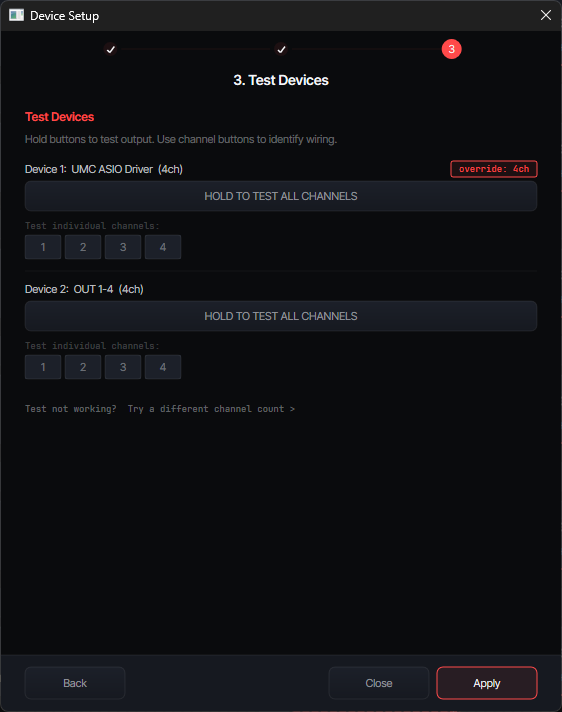
Device Setup -- Step 3
Hold the "HOLD TO TEST ALL CHANNELS" button to send a signal through every channel simultaneously. Then test individual channels one at a time using the numbered buttons below.
- Hold "TEST ALL CHANNELS" to confirm that all your shakers respond. You should feel vibration from every connected transducer.
- Test individual channels using buttons 1, 2, 3, 4 (etc.). Note which physical shaker vibrates for each channel number. Write this down -- you'll need it for Zone Setup.
- If a channel doesn't produce output, check your wiring, amplifier power, and volume knobs. You can also click "Try a different channel count" if the auto-detection was wrong.
- Once all channels are confirmed working, click Apply to save and close the wizard.
Zone Setup
Map each zone (LF, RF, LR, RR, or Custom) to the correct physical channel on your audio device. This is where you tell Track Impulse which shaker is where on your rig.
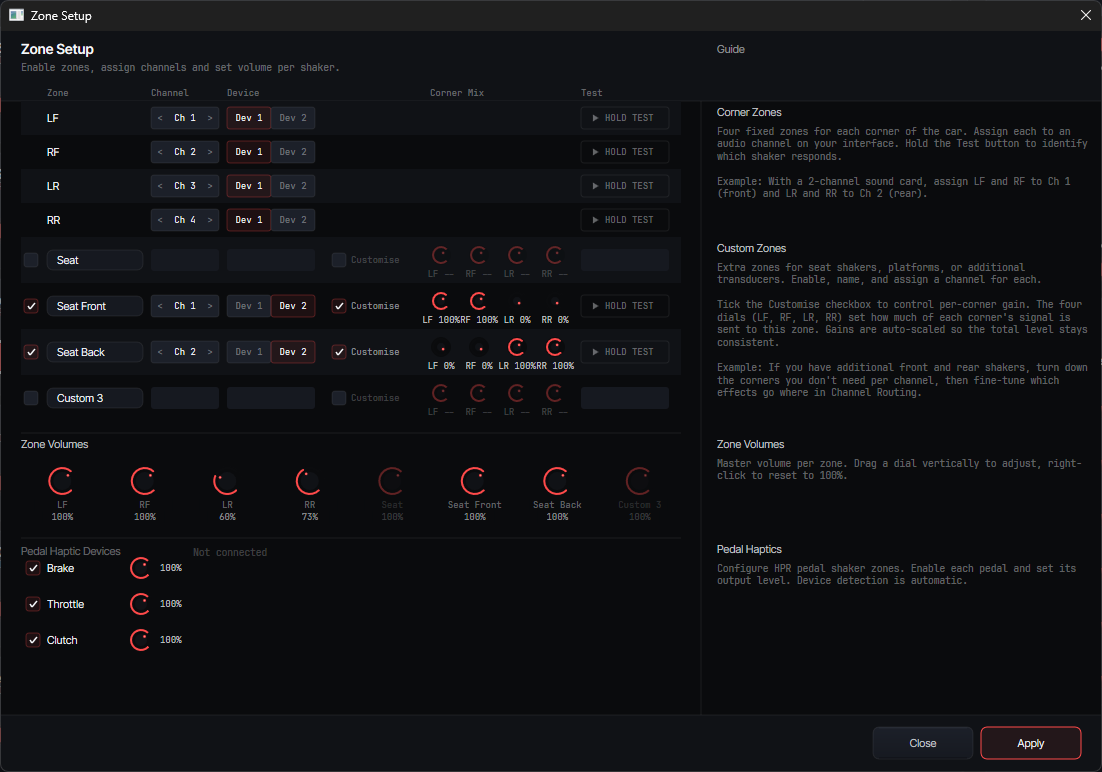
Zone Setup Dialog
Enable zones with the checkboxes on the left, assign each zone to a channel using the < Ch N > selector, and verify with the "HOLD TEST" button. Volume knobs per zone let you balance output levels. The four corner zones (LF, RF, LR, RR) are on by default. Custom zones (C1--C4) can be enabled for additional shakers like a seat transducer or pedal shaker.
- Enable your zones. For a standard 4-corner setup, enable LF, RF, LR, RR (they're on by default). Only enable Custom zones (C1--C4) if you have additional shakers wired up, such as a seat shaker or pedal transducer.
- Assign channels. Use the
< Ch N >selector to assign each zone to the physical channel you identified during testing. For example, if Channel 1 buzzes your front-left shaker, set LF → Ch 1. - Hold Test for each zone to confirm the right shaker vibrates. If the wrong one moves, swap the channel assignments until each zone matches its physical shaker position.
- Adjust zone volumes using the knobs at the bottom. Start at 100% and lower zones that feel too strong after a few laps.
- Pedal Haptic Devices: if you have SImagic HPR pedals connected via USB, they appear in a separate section at the bottom. Enable the pedals you want to receive haptics (Brake, Throttle, Clutch). These use a direct USB HID connection, not your audio channels.
- Click Apply to save your zone configuration.
Recommended Zone Setup by Shaker Count
Not sure how to map your zones? Here are the recommended channel assignments for the three most common setups. Enable all four corner zones (LF, RF, LR, RR) regardless of how many shakers you have -- Track Impulse will send the combined signal to whichever channel each zone is assigned to.
1 Shaker
Seat or platform mount
2 Shakers
Front + rear
4 Shakers
One per corner
Channel Routing
Fine-tune which haptic effects go to which zones, and at what volume. This is where you tailor the feel to your rig and preferences. Routing and effect settings are saved per-sim -- the changes you make here only apply to whichever sim is currently active in the header, so iRacing, ACC, and AC each have their own independent setup.
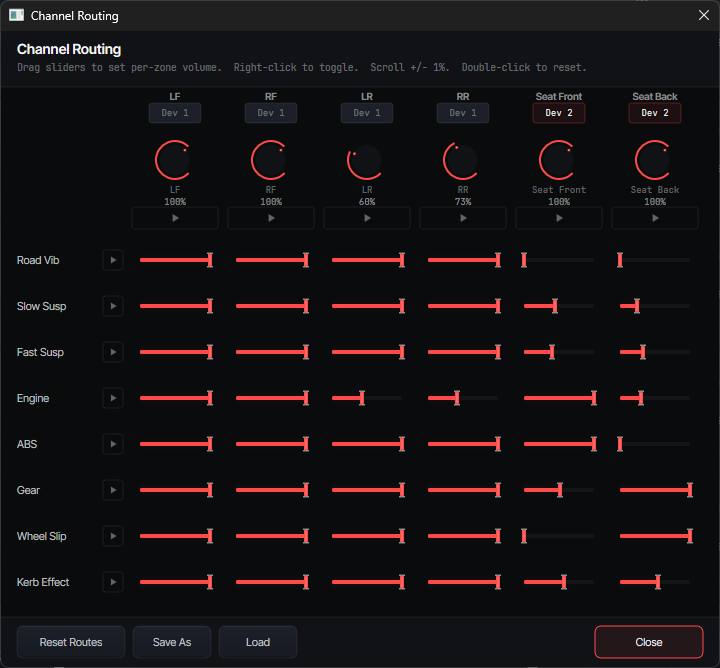
Channel Routing Matrix
Each row is an effect (Road Vib, Spring Susp, Shock Susp, Kerb, Engine, ABS, Gear, Wheel Slip). Each column is a zone. The sliders control how much of each effect reaches each zone, from 0% (off) to 100% (full).
- Understand the matrix. Rows = effects, columns = zones. Each slider controls the volume of that effect in that zone (0.0 to 1.0). Per-zone master volume knobs are at the top of each column.
- Play buttons (▶) on each row and zone header let you preview that effect or zone in isolation, so you can hear exactly what you're adjusting.
- Drag sliders to set volume. Right-click a slider to toggle it on/off (sets to 0.0 or restores). Scroll for +/- 1% fine adjustment. Double-click to reset to the default value.
- Start with defaults and adjust after a few laps. Common tweaks: reduce engine rumble if it overpowers kerbs, boost ABS on front zones where your brake pedal's shaker is, or lower rear zones for road vibration if the rear feels too busy.
- Save As to save your routing profile. Load to switch between profiles. Routing profiles are saved per-sim, so you can tune differently for iRacing vs ACC vs LMU.
- Click Close when done.
Volume Chain
The final volume of any effect at any zone depends on four volume controls stacked together. Turning any one of them down reduces the output. Understanding this helps you make efficient adjustments:
Effects Reference
Track Impulse generates haptic effects from your sim's live data. Each effect gets its own card in the main window with a volume slider, frequency slider, waveform monitor, and test button. Here's what each one does and what you'll feel.
Effects fall into two categories. Background effects (Road Vibration, Engine Rumble) run continuously while you're driving and give a constant sense of being in the car. Event effects (Spring Suspension, Shock Suspension, Kerb, ABS, Gear Change, Wheel Slip) fire on specific triggers like hitting a kerb, locking a wheel, or shifting gear. Together they create a complete haptic picture: the background keeps the shakers alive between events.
| Effect | What You Feel |
|---|---|
| Road Vibration | [Background] Constant rumble that recreates the tyre friction and road feel you'd get through the steering wheel in a real car. Smooth tarmac feels different from rough concrete or gravel. Gets stronger at higher speeds. Each corner responds independently. Leave at default volume, frequency, and priority. |
| Spring Suspension | [Event] The slow, heavy motion of the car's body -- rolling through corners, diving under braking, squatting under acceleration, and heaving over crests. Think of the gentle push-and-pull that loads you into the seat. |
| Shock Suspension | [Event] The sharp, quick jolts -- bumps, seams, track joints, and expansion cracks. The sudden impacts that travel through the dampers. This is the "thud" you feel when you hit something abrupt in the road surface. |
| Kerb (iRacing only) | [Event] A dedicated kerb and rumble strip effect, separate from the Shock Suspension. Reproduces the distinct rhythmic vibration of riding over kerbs. Only available in iRacing, where dedicated kerb data is provided by the sim. In other sims, kerb hits are captured by the Shock Suspension effect. |
| Engine Rumble | [Background] The mechanical vibration of the engine transmitted through the chassis. Strongest at idle and low RPM. At higher speeds, road and suspension effects naturally take over. This gives your rig a constant "heartbeat" feel. |
| ABS / Wheel Lock | [Event] The rapid pulsing you feel when the anti-lock braking system is working -- that familiar juddering through the brake pedal and chassis. Also detects full wheel lockup when ABS is off or overwhelmed. Each wheel is independent. |
| Gear Change | [Event] A short, sharp thud on each upshift or downshift. Recreates the mechanical impact of a gear change travelling through the transmission tunnel. |
| Wheel Slip | [Event] The buzzing vibration of tyres losing and regaining grip -- wheelspin under acceleration, or sliding through a corner. Each wheel is independent, so you can feel which end of the car is stepping out. This is a separate effect from ABS. |
Per-Sim Notes
- ACC: no special configuration required. Track Impulse reads shared memory data directly.
- Assetto Corsa: no special configuration required. Track Impulse reads shared memory data directly.
- LMU: make sure the shared memory plugin is enabled in LMU's plugin settings. Without it, Track Impulse cannot read telemetry data.
- AC EVO: Track Impulse connects after you leave the pits and begin driving on track. The sim does not provide data while in the garage or pit lane.
- AC Rally: no special configuration required. Track Impulse reads shared memory data directly.
Advanced Settings
Each effect card has an Advanced Settings button (gear icon) that opens per-effect synthesis controls. These let you shape the character of each haptic effect beyond simple volume and frequency.

Advanced Settings
Per-effect controls for waveform type, harmonic count and decay, and priority rank. These settings are saved in your sim profile.
Waveform Type
Each effect can use a different vibration shape. This changes how the effect "feels" through your shakers:
- Sine (default) -- smooth, natural vibration. The most comfortable and realistic feel. Works great for everything.
- Square -- sharp, punchy vibration. Feels more aggressive, like a switch flicking on and off. Try it on ABS or Gear Change for a crisper feel.
- Sawtooth -- gritty, buzzy vibration. Adds a raw, mechanical quality. Can work well for Wheel Slip or Engine Rumble.
- Noise -- rough, random vibration. Feels like static or roughness. Can add realism to Road Vibration on rough surfaces.
Harmonics
Harmonics add extra layers of vibration on top of the base effect, making it feel richer and more complex -- similar to the difference between a pure tone and a real mechanical sound:
- Harmonic count (0--4) -- how many extra layers to add. 0 means just the basic vibration (default). 1--2 adds subtle richness. 3--4 makes the effect noticeably more complex.
- Harmonic decay (0.0--1.0) -- how quickly each extra layer fades out. Default is 0.5 (each layer is half as strong as the one before). Lower = layers fade faster. Higher = layers stay strong.
- Best use case: Engine Rumble benefits the most. Adding 1--2 harmonics makes the engine feel more like a real motor vibrating through the chassis, rather than a simple hum.
Priority Rank
When several effects play at the same time and the combined vibration would be too strong, priority decides which effects stay loud and which ones get turned down automatically:
- Priority 1 (highest) -- these effects always play at full strength. Good for ABS and Shock Suspension, which give you important driving feedback.
- Priority 2--7 (lower) -- these effects get turned down when things get busy. Engine rumble and road texture are good candidates for lower priority since they're less critical.
- All equal (default) -- when all effects have the same priority, everything gets turned down equally if needed. This works well for most setups and is the out-of-the-box behaviour.
Profiles
Profiles save your complete effect and routing configuration for a specific sim. Each supported sim has its own independent set of profiles, so you can tune iRacing and ACC completely differently.
- Save saves changes to the currently active profile. If no named profile is active, it saves to the sim's default settings.
- Save As lets you create a named profile (e.g. "ACC Wet", "iRacing Spa"). This stores all effect volumes, frequencies, routing gains, zone configurations, waveform types, harmonics, and priorities.
- Load opens a list of saved profiles for the current sim. Select one to load it. The stepper arrows in the header bar also let you cycle through saved profiles quickly.
- Share / Import: profiles are saved as JSON files under
%APPDATA%\TrackImpulse\profiles\{simname}\. You can copy these files to share with others or import profiles from the community. The Community Profiles page on the website has profiles shared by other users. - Moving to a new PC? Copy the entire
%APPDATA%\TrackImpulse\folder from the old machine onto the new one (after installing Track Impulse there). That carries over all your profiles, routing, and per-sim tuning. Device Setup will need to be redone since the new PC has different audio hardware. - Reset to defaults restores the factory-default settings for the current sim. This does not delete saved profiles -- it just sets the active configuration back to defaults.
Options
The Options dialog (accessible from the header bar) contains application-wide settings that apply across all sims and profiles.
- UI Density -- three presets that control the size and spacing of effect cards. Smaller density fits more cards on screen at once; larger density is easier to read and interact with.
- Accent Theme -- choose from 9 colour themes that change the accent colour throughout the interface. Purely cosmetic -- has no effect on haptic output.
- VR Auto-Minimize -- when enabled, Track Impulse automatically minimizes when it detects a VR runtime (
vrserver.exe). This prevents the TI window from stealing GPU focus in WDDM, which can cause frame time spikes in VR. - Auto-Update -- Track Impulse checks for updates automatically and notifies you when a new version is available. You can choose to update immediately or defer.
- Telemetry Consent -- Track Impulse can send anonymous usage data (which version you're running and which sim you're using) to help improve the software. No personal information is collected. You can toggle this on or off at any time.
- Shortcuts & Tips -- a reference panel listing all keyboard shortcuts and interaction tips for the interface.
Tips
Advice for getting the best feel out of your setup.
Tuning Tips
- Start with defaults. Drive a few laps before changing anything. Track Impulse's defaults are tuned for a balanced feel.
- Adjust one thing at a time. Change a single slider, drive a lap, then decide if it's better. Changing multiple settings at once makes it hard to know what helped.
- Use the test buttons. Each effect card has a test button that plays a preview signal through the routing matrix. This helps you isolate which effect is causing a particular sensation.
- Master volume is your friend. If everything feels too strong or too weak, adjust the master volume first before touching individual effects.
- Save profiles per sim and condition. Wet tracks, high-downforce cars, and oval tracks all benefit from different tuning. Save named profiles for each scenario.
Keyboard Shortcuts
- Scroll wheel on any slider for +/- 1% fine adjustment.
- Right-click a routing slider to toggle it on/off instantly.
- Double-click a slider to reset it to its default value.
- Alt+Shift+T -- global hotkey to minimise/restore Track Impulse. Works even when the sim is in focus.
Troubleshooting
Common issues and how to fix them.
General
- No audio output at all? Check the status bar at the bottom of the main window. If it shows red, the audio stream failed to start. Open Device Setup and verify your device is selected and powered on. Try a larger buffer size.
- Hearing engine sound or game audio through your shakers? Two places to check. First, in Windows Sound settings, make sure your headphones or speakers are set as the default playback device, not your shaker interface. Second, open your sim's own audio settings and confirm it's outputting to your headphones/speakers -- some sims remember a specific device by name, so they can be pointed at the shaker interface independently of Windows. Track Impulse only sends haptic signals; any music or engine sound you hear through the shakers is coming from elsewhere.
- No effects while driving? Make sure the sim is running and the sim name appears in the header bar. Track Impulse automatically detects running sims -- if the sim name doesn't appear, make sure you're on-track (some sims only send data when you're actually driving, not when sitting in menus). See Sim not detected below for per-sim fixes.
- Crackling or dropouts? Increase the buffer size in Device Setup. If using WDM-KS and the problem persists, try switching to WASAPI Exclusive. Also check USB bandwidth -- avoid USB hubs and connect your audio interface directly to a USB port on the motherboard.
- Latency feels high? Confirm you're using ASIO (check the status bar at the bottom). Check the buffer size -- 64 is ideal. Also make sure your sim is running at a decent frame rate, since faster frame rates mean faster data updates to Track Impulse.
- Effects feel weak or missing? Two common causes. First, if the rig feels dead between kerbs and bumps, check that Road Vibration and Engine Rumble are enabled and at reasonable levels -- these are background effects that run constantly and keep the shakers alive. Second, if a specific effect (like Kerb in iRacing) feels too quiet even when it should be firing, you may be running old default settings from a previous version. Click Reset to defaults in the Profiles section to pick up the latest priority and level tuning, then adjust from there.
- A particular effect is not working? Work through these checks in order:
• Volume: is the effect's card slider turned up? Check both the per-effect volume and the master volume in the header.
• Routing: open Channel Routing and check that the effect's row has non-zero values for the zones you expect. A slider at 0.0 means that effect is muted on that zone.
• Priority: if the effect only disappears when other effects are active, it may be getting ducked. Open Advanced Settings for that effect and check its priority rank. Lower-priority effects get turned down when the output is busy.
• Test button: click the test button on the effect card. If you feel the test signal through your shakers, the effect and routing are working -- the issue is with the sim data. If you feel nothing, the problem is in the volume or routing chain above.
• Sim data: some effects only fire in specific situations. ABS only triggers during heavy braking, Wheel Slip only during loss of grip, Kerb only when riding a rumble strip. Make sure you're triggering the right condition on track.
• Old defaults: if you upgraded from an older version, click Reset to defaults to pick up the latest effect priorities and levels, then adjust from there. - Sim frame drops while TI is open? Minimise Track Impulse before driving. On Windows (WDDM), the foreground window gets GPU scheduling priority, so leaving TI visible can add frame time to your sim. Use Alt+Shift+T to quickly minimise and restore. VR users can enable VR Auto-Minimize in Options to handle this automatically.
- Using VoiceMeeter, Equalizer APO, or audio enhancement software? Make sure these are not active on the same audio device as your shakers. They can intercept or modify the audio stream, add latency, or block Track Impulse from opening the device. Also disable any vendor audio effects on the device in Windows Sound → Properties → Enhancements (Realtek, Nahimic, Sonic Studio, Dolby, DTS, Waves).
- Migrating from SimHub / SimVibe? You don't need to uninstall SimHub, but if SimHub is still running and configured to output to your shaker device it will hold the device and Track Impulse won't be able to open it. Close SimHub before launching Track Impulse, or disable the bass shaker / haptic plugin inside SimHub so it no longer claims the audio device. See the SimHub latency guide for more on why people switch.
- iRacing: doubled or muddy effects? Disable iRacing's built-in LFE system (Options → Sound → Enable Low Frequency Effects = OFF). Running both iRacing LFE and Track Impulse sends doubled, conflicting signals to your shakers.
Sim Not Detected
If the sim name doesn't appear in the Track Impulse header bar when your sim is running, work through the checks for your sim. Track Impulse reads live telemetry data from each sim's official data interface -- if that interface isn't enabled or accessible, no effects can be generated.
- iRacing -- make sure telemetry is enabled. Open
Documents\iRacing\app.iniand confirmirsdkLog=1under the [Misc] section. Telemetry only streams while you're on track or in a replay -- garage and menu screens won't trigger Track Impulse. - Assetto Corsa Competizione (ACC) -- shared memory is on by default; no configuration needed. If detection fails, exit ACC fully (not just back to the main menu) and relaunch. Both Steam and Microsoft Store installs work identically.
- Assetto Corsa (original) -- shared memory is enabled by default. If using a Microsoft Store / GamePass install, make sure Track Impulse can read from the sandboxed shared memory region -- if detection fails, try running Track Impulse as administrator. Steam installs almost always work without elevation.
- Le Mans Ultimate (LMU) -- the rFactor 2 shared memory plugin must be enabled. In LMU's launcher, open Settings → Plugins and tick the shared memory plugin. Restart LMU. Without this plugin enabled, no telemetry leaves the sim.
- AC EVO -- the sim only streams telemetry once you've left the pits and are on track. Sitting in the garage, on the lobby screen, or in pit lane will not trigger Track Impulse. Drive out to the pit exit and the connection will activate.
- AC Rally -- no configuration needed. If detection fails, fully exit and relaunch.
- Run-as-admin mismatch -- if your sim is running as administrator but Track Impulse isn't (or vice versa), Windows can block the shared memory read. Run both at the same elevation. The simplest fix is to launch neither as admin unless something else requires it.
Audio Quirks
- Sample rate mismatch (most common WDM-KS / WASAPI issue). If you picked WDM-KS or WASAPI and the audio stream won't start, or only some channels work, the device's Windows sample rate is probably different from what Track Impulse is requesting. Open Windows Sound settings → right-click your shaker device → Properties → Advanced and set the default format to 16 bit, 48000 Hz (DVD Quality). Apply, reopen Track Impulse's Device Setup, and retest. (Native ASIO drivers bypass this entirely -- they negotiate sample rate directly with the hardware.)
- Status bar shows red after the audio device worked previously? Another app probably grabbed the device in exclusive mode. Close any audio apps that may have opened in the background (browser, Discord, OBS, voice chat in your sim), then in Track Impulse open Device Setup and click Apply again to re-open the stream.
- Windows audio "enhancements" still active. In Windows Sound → your shaker device → Properties → Enhancements, tick Disable all enhancements. Vendor packages like Realtek Audio Console, Nahimic, Sonic Studio, Dolby Atmos, and DTS:X can re-enable these even after you turn them off in Windows -- check the vendor app too.
Updates & Rolling Back
- Reset to defaults after every major update. Settings, priorities, and routing defaults are tuned and rebalanced with most releases. If you've upgraded from an older version and effects feel off (especially Engine Rumble, Kerb, or ABS feeling too quiet), open Profiles and click Reset to defaults. Your old profile is still saved -- you can switch back any time.
- Recent update broke something for you? You can install an older build from the old versions archive while we fix it. Please also drop a note via the feedback page or email support so we know to prioritise the fix.
- Auto-update notifications. Track Impulse checks for updates on launch. If you'd rather defer, close the prompt -- it will reappear next time. To force a check, restart the app.
Still Stuck? Send Us A Log
If nothing above resolves your issue, the fastest way to get help is to send us a log file. It tells us exactly what Track Impulse saw at startup, which devices were detected, which sim is running, and where it failed -- usually enough to diagnose in one reply instead of three.
- Reproduce the issue once (launch Track Impulse, open Device Setup, hit the problem). This makes sure the log captures it.
- Open File Explorer and paste this into the address bar:
%APPDATA%\TrackImpulse\logs\ - Grab the most recent
.logfile (sorted by date modified). - Email it to support@track-impulse.com with a short description of what you tried and what happened. Screenshots of Device Setup and the status bar help too.